
Kitchen Faucet Hole Sizes: A Comprehensive Guide
Replacing a kitchen faucet sounds simple until the new faucet reaches your countertop and the mounting holes do not line up.
A hole that is too small can prevent the faucet from fitting at all, while the wrong spacing can make a multi-hole faucet impossible to install without modifying the sink or countertop. Even a faucet that technically fits may cause problems if there is not enough room underneath for its mounting hardware.
That is why understanding kitchen faucet hole sizes before purchasing a new faucet can save time, money, and unnecessary alterations.
There is no single hole measurement that works for every faucet. Many kitchen faucet installations use holes around 1 3/8 inches (35 mm) in diameter, but actual requirements vary by faucet manufacturer, mounting system, sink material, and faucet configuration.
This guide explains common faucet hole dimensions, how to measure your existing installation, what affects compatibility, and practical ways to work with different hole configurations.
Standard Kitchen Faucet Hole Sizes

Kitchen sinks and countertops can have one, two, three, four, or even more openings depending on the faucet and accessories installed.
For many modern kitchen faucets, a mounting hole of approximately 1 3/8 inches (35 mm) is common. However, you should never assume that measurement applies to the faucet you plan to buy.
Some models require a smaller or larger opening. The manufacturer’s installation instructions should always be your final reference.
Here is a quick overview:
| Faucet Configuration | Typical Arrangement | Important Consideration |
|---|---|---|
| Single-hole | One mounting hole | Hole diameter and mounting clearance |
| Two-hole | Faucet + accessory | Distance between components |
| Three-hole | Faucet/handles across three holes | Center-to-center spacing |
| Four-hole | Three faucet holes + accessory | Accessory position and spacing |
| Bridge faucet | Usually multiple mounting points | Exact spacing varies by model |
These configurations describe the layout rather than guaranteeing a particular hole diameter.
Single-Hole Faucets

A single-hole faucet combines the spout and controls into one main faucet body.
This design is especially common in modern kitchens because it creates a clean appearance and requires fewer openings in the sink or countertop.
A 1 3/8-inch mounting hole is common for many single-hole kitchen faucets, but some products specify different dimensions.
Before purchasing, check:
- Required mounting-hole diameter
- Maximum countertop or sink thickness
- Clearance around the faucet base
- Space underneath for mounting hardware
- Required backsplash clearance
- Supply-line connections
The visible faucet base may be much wider than the actual mounting hole.
If you have an existing three-hole sink but prefer a single-hole faucet, you may still have options. Many single-handle faucets are available with an optional or included deck plate that covers unused openings.
Multi-Hole Faucets
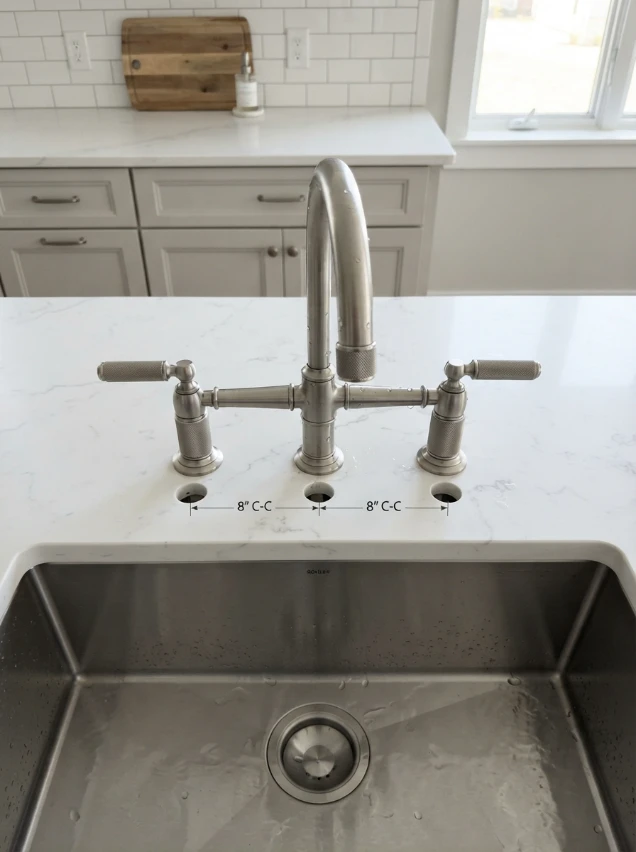
Multi-hole configurations separate different faucet components across several openings.
A traditional three-hole setup may include a central spout with separate hot and cold handles. Another design might use one opening for the faucet and another for a side sprayer.
Four-hole arrangements can accommodate additional components such as:
- Side sprayers
- Soap dispensers
- Separate handles
- Filtered-water faucets
With these installations, spacing matters just as much as hole diameter.
Do not simply measure the overall width from the first opening to the last. Measure from the center of one hole to the center of the next, because faucet specifications commonly use center-to-center dimensions.
Bridge Faucets

Bridge faucets are recognizable by their exposed connection between the hot and cold controls and the spout.
They can add a traditional, farmhouse, or professional-inspired appearance to a kitchen, but their mounting requirements deserve careful attention.
Unlike a simple single-hole model, a bridge faucet normally relies on multiple mounting points. The required spacing can vary considerably between products.
When considering a bridge faucet, verify:
- Number of mounting holes
- Diameter required for each opening
- Center-to-center mounting distance
- Countertop thickness limits
- Clearance behind the faucet
- Space beneath the sink
A bridge faucet should be selected using the manufacturer’s installation drawing rather than a general assumption about standard kitchen faucet holes.
How to Measure Your Existing Faucet Holes

Accurate measurements are especially important when replacing a faucet without replacing the sink or countertop.
Even a small measurement error can lead you to purchase an incompatible model.
If plumbing disconnection or faucet removal is outside your experience, consider having a qualified plumber handle that part of the project.
Step 1: Gather Your Tools
Before starting, gather a few basic items:
- Tape measure
- Ruler or caliper
- Adjustable wrench
- Basin wrench if required
- Flashlight
- Pencil and paper
- Cleaning cloth
A caliper is particularly useful for measuring the diameter of an existing hole accurately.
Step 2: Remove the Old Faucet
Turn off both hot and cold water supplies before disconnecting anything.
Open the faucet briefly afterward to relieve pressure and confirm that the water supply has been shut off.
Place a towel or small container beneath the connections because some water may remain in the supply lines.
Disconnect the supply lines and remove the mounting hardware according to the faucet’s installation method.
Do not force corroded components. If fittings are severely stuck or you are uncertain about the plumbing, professional assistance can prevent damage.
Step 3: Clean the Area
Old faucet bases can leave behind mineral deposits, old sealant, grime, or plumber’s putty.
Clean the mounting surface before measuring.
This makes the edges of each hole easier to identify and also gives you a chance to inspect the sink or countertop for cracks, corrosion, or other damage.
Step 4: Measure the Diameter of the Holes
Measure straight across the widest part of each circular opening.
If possible, use a caliper. Otherwise, a precise ruler can provide a reasonable measurement.
Record every hole separately instead of assuming they are identical.
For example:
Hole 1: 1 3/8 in.
Hole 2: 1 3/8 in.
Hole 3: 1 3/8 in.
Compare these measurements with the installation specifications for your intended faucet.
Step 5: Measure the Distance Between Holes
For multi-hole configurations, measure center to center.
An easy method is to identify the approximate center of each opening and measure between those points.
Spacing is critical because two faucets requiring the same hole diameter can still have completely different mounting layouts.
If the manufacturer provides a technical diagram, compare your measurements directly with it.
Step 6: Check the Deck Thickness
Hole dimensions are only part of faucet compatibility.
The deck thickness refers to the thickness of the sink, countertop, or mounting surface through which the faucet passes.
A thick stone countertop, for example, may require longer mounting hardware than a thin stainless-steel sink deck.
Measure the mounting surface and compare it with the faucet manufacturer’s maximum deck-thickness specification.
Also inspect the area underneath. Clips, cabinet framing, sink bowls, disposal units, or other plumbing components can interfere with faucet mounting hardware.
Step 7: Take Notes and Double-Check
Write down:
- Number of holes
- Diameter of each hole
- Center-to-center spacing
- Deck thickness
- Available clearance underneath
- Distance from faucet position to backsplash
Then measure everything again.
Spending an additional two minutes checking measurements is much easier than returning a faucet after discovering it does not fit.
Factors Affecting Faucet Hole Size Choice: What Mistakes to Avoid?
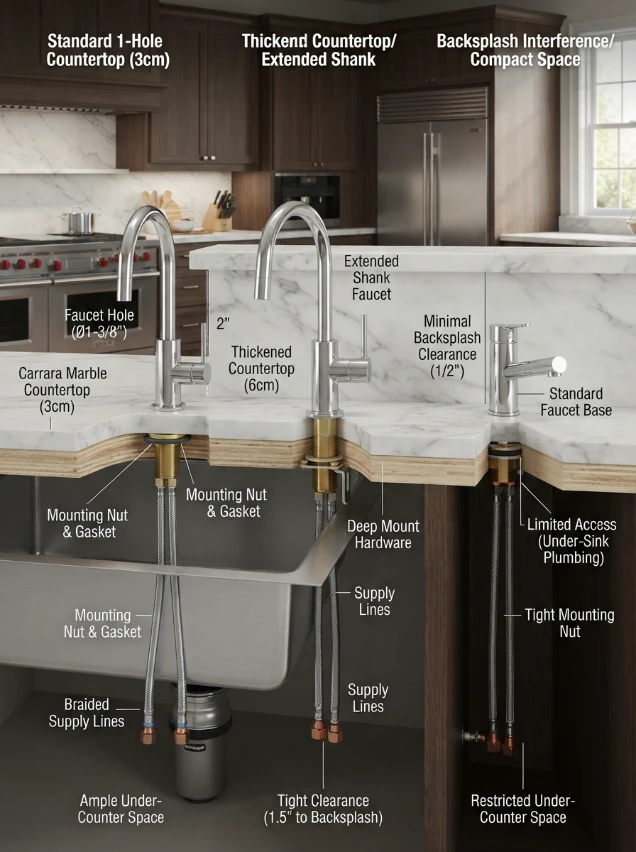
Choosing a faucet based only on appearance is one of the easiest ways to create installation problems.
Your existing sink, countertop, available clearance, faucet mounting system, and accessories all influence which faucet will work.
Factors Affecting Faucet Hole Size Choice
1. Faucet design
Single-handle, widespread, bridge, pull-down, and commercial-style faucets can have very different mounting requirements.
2. Existing hole configuration
An existing three-hole sink gives you different replacement options from a countertop with only one opening.
Unused holes can sometimes be covered, but adding new holes may be considerably more difficult.
3. Sink or countertop material
Stainless steel, composite sinks, solid-surface materials, porcelain, granite, and quartz require different approaches if an opening needs modification.
Drilling the wrong material with unsuitable equipment can cause cracking, chipping, or permanent damage.
4. Deck thickness
A faucet’s mounting shank and hardware must be capable of passing through and securing properly to the mounting surface.
5. Faucet base dimensions
The faucet base needs sufficient contact with the mounting surface. An oversized or irregular existing opening may not provide proper support even when the mounting hardware passes through.
6. Additional accessories
Think about whether you want a:
- Soap dispenser
- Side sprayer
- Filtered-water tap
- Air-gap fitting
- Other sink-mounted accessory
An unused hole may actually become useful rather than needing to be covered.
7. Manufacturer specifications
The installation manual is more reliable than a generalized faucet-size chart.
Two faucets that look almost identical can have different mounting requirements.
What Mistakes to Avoid for Kitchen Faucet Holes?
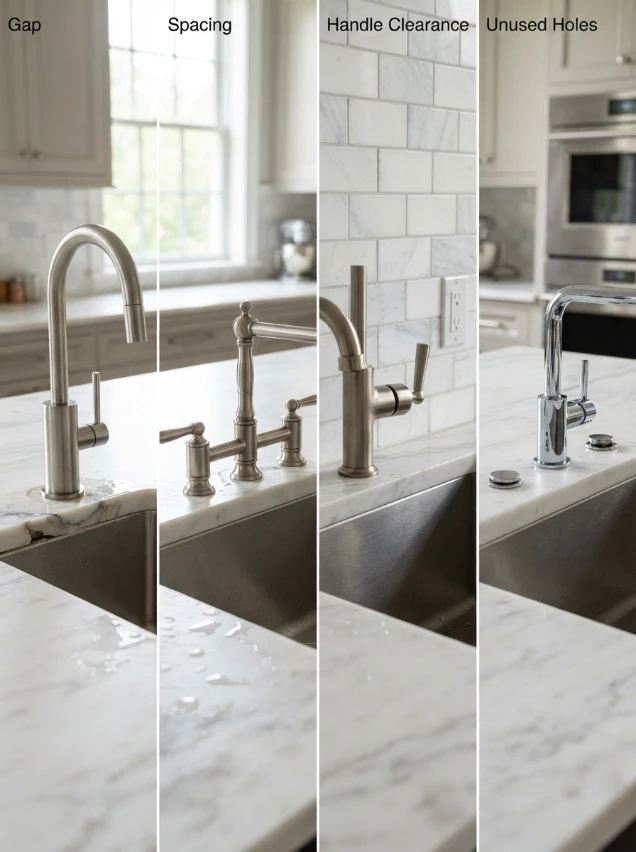
Several common mistakes can turn an otherwise straightforward faucet replacement into an expensive project.
Assuming every faucet uses a 1 3/8-inch hole
While this is a common dimension, it is not universal.
Measuring from hole edges instead of centers
For multi-hole layouts, incorrect spacing measurements can make a compatible-looking faucet impossible to mount.
Ignoring countertop thickness
Correct hole diameter does not guarantee that the faucet’s mounting hardware will work with your deck.
Drilling before buying the faucet
If you are creating openings in a new countertop, obtain the faucet’s installation template or technical specifications first.
Forgetting backsplash clearance
Some handles move backward when operated. A faucet can fit the mounting hole perfectly yet still hit the wall or backsplash.
Covering unused holes poorly
Use a suitable deck plate or purpose-made hole cover rather than an improvised solution that may allow moisture beneath the sink.
Modifying expensive countertops without professional guidance
Stone, engineered surfaces, porcelain, and similar materials can be damaged during drilling. For these surfaces, professional fabrication may be the safer choice.
7 Ways to Adapt Faucets to Different Hole Configurations
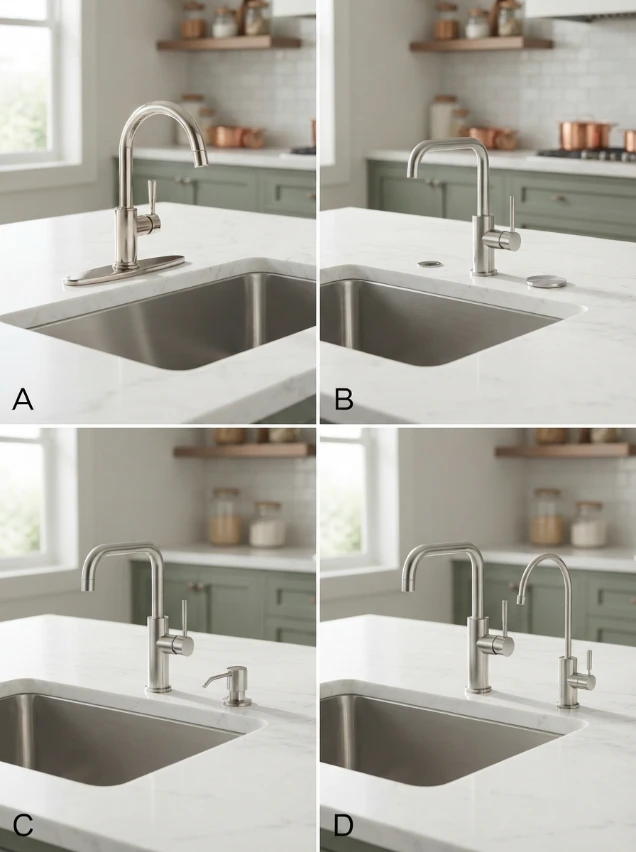
Your preferred faucet does not necessarily need to match the old configuration exactly. Depending on the sink and faucet, several solutions may be possible.
1. Use a Deck Plate
A deck plate, sometimes called an escutcheon, can allow certain single-hole faucets to be installed over an existing multi-hole arrangement.
The plate covers the unused openings and creates a finished appearance.
Always confirm that the deck plate is compatible with your specific faucet.
2. Install Faucet Hole Covers
If you have one or more unused holes, individual sink-hole covers can provide a simple solution.
Choose covers designed for your sink or countertop and make sure they seal appropriately.
3. Use an Empty Hole for a Soap Dispenser
Instead of covering an unused opening, turn it into a useful feature.
A built-in soap dispenser can make good use of an extra sink hole while keeping bottles away from the countertop.
4. Add a Filtered-Water Faucet
Another spare opening can sometimes accommodate a small drinking-water faucet connected to a compatible filtration system.
Check the filtration system and faucet requirements before installation.
5. Enlarge an Existing Hole When Appropriate
If an opening is slightly smaller than the required mounting diameter, enlargement may sometimes be possible.
However, the correct method depends heavily on the sink or countertop material.
A stainless-steel sink and a stone countertop should not be treated as the same drilling project. When expensive or brittle surfaces are involved, consult a qualified installer or countertop fabricator.
6. Create an Additional Hole
A new opening may be necessary when moving from a single-hole arrangement to a configuration requiring an accessory or separate control.
Before drilling, check what is beneath the proposed location.
The new opening needs adequate clearance for the mounting hardware and plumbing connections.
Again, the feasibility depends on the mounting material.
7. Choose a Faucet Designed for Your Existing Layout
Sometimes the simplest adaptation is no adaptation at all.
Once you know your hole diameter, spacing, deck thickness, and available clearance, look specifically for faucets designed around those measurements.
This reduces installation complexity and avoids unnecessary changes to the sink or countertop.
FAQs About Kitchen Faucet Hole Sizes
Can I change from a three-hole to a single-hole faucet?
Yes, in many cases.
A single-hole faucet can often be installed using one of the existing openings while a compatible deck plate covers the remaining holes.
Alternatively, unused openings may accommodate accessories such as a soap dispenser.
The important point is to verify that the chosen faucet and deck plate fit your existing spacing and mounting surface.
What if my hole size is slightly off from the standard?
Start by checking the exact mounting-hole range specified by the faucet manufacturer.
If your opening falls within that range, modification may not be necessary.
If the hole is too small, it may sometimes be enlarged depending on the mounting material. If it is too large, the faucet base and mounting hardware must still provide secure support and proper coverage.
Do not enlarge or modify a countertop until you know the exact dimensions required.
How do I know if my sink can support a certain faucet type?
Check four things first:
- Number and diameter of existing holes
- Center-to-center spacing
- Sink or countertop thickness
- Clearance above and below the mounting area
Then compare those measurements with the faucet manufacturer’s installation specifications.
Also consider faucet weight and sink rigidity. Large, tall faucets mounted on relatively thin sink decks may benefit from a manufacturer-approved support or reinforcement solution if specified.
Final Word
Understanding kitchen faucet hole sizes is one of the most important steps in choosing a replacement faucet.
While approximately 1 3/8 inches (35 mm) is a common mounting-hole diameter for many kitchen faucets, it should be treated as a useful reference rather than a universal standard. The correct measurement is always the one specified for your particular faucet.
Measure the diameter, count the openings, check center-to-center spacing, confirm deck thickness, and inspect the available mounting clearance before ordering.
If you are switching between faucet configurations, deck plates, hole covers, soap dispensers, and other accessories can often help you make use of an existing layout without unnecessary countertop modifications.
Most importantly, measure first and buy second. That simple habit can prevent one of the most common and frustrating kitchen faucet installation problems.